This is a brief tutorial of how to create your own classifier. I’ve used the term class synonymously to category and classifier to categorizer.
1. Determine the classifier domain
Before a classifier can start to classify it needs to be created and trained. First you should ask yourself what you want the classifier to do, is it a spam filter? a news categorizer? Let’s assume it’s a news categorizer for this tutorial. So we create a news classifier with the name ‘Example News Categorizer’.

Fig 1. Create the classifier
2. Define the relevant classes
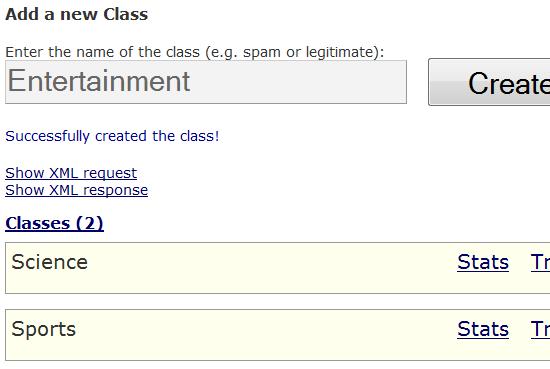
Secondly you need define what classes your classifier should include. Choosing relevant classes is straightforward – just ask yourself what categories are relevant for the domain you have chosen. Once you have selected the classes you want the classifier to distinguish between you create them. This is easy in our Graphical User Interface but can also be done via our web API. For our small example we create the following three classes: Science, Sports and Entertainment. You can create as many classes as you want.

Fig 2. Create the classes (categories)
You can also add and remove classes dynamically – so don’t worry if you aren’t 100% sure that you have included all.
3. Collect training data
Before the classifier can start to categorize texts into the classes we need to learn it how texts belonging to the different classes look. This is the hardest part as it requires you to collect actual training data. You can collect it from any source you find appropriate.
3.1 Amount of training data
It’s hard to generalize the amount texts needed for a classifier to work as it’s highly dependent on the domain. Simple domains such as classifying the language of a text only requires a small amount while harder problems such as seeing difference between texts written by males and females requires much more training data. However to test an idea I suggest at least 20 documents per category. With each document in the same format of those that will be used for classification later (e.g. for a spam filter you train it on e-mails). 20 is the bare minimum – from there the classifier only gets more accurate.
For our news categorizer I collected 20 plain text articles per class from random sources on Internet.
3.2 Automate the collecting!
In some cases you can automate the data collection by finding trusted sources on Internet. For example for our news classifier I could jack into three RSS feeds for Science, Sports and Entertainment and automatically gather the data. Ahhh, no manual collecting!! Nice.
4. Train the classifier
So you have collected training data in some form (perhaps text files on your hard drive or lists of urls or some feeds), now it’s time to train the classifier. This can be done manually in the GUI or automated if you have some basic programming skills. For our tutorial I found 20 news articles per class and copied and pasted the them manually into the GUI, it took me about 30 minutes.

Fig 3. Training the classifier via the GUI
4.1 Automate the training! (requires novice programming skills)
Training a classifier through the GUI can be cumbersome if large amounts of training data is tractable. My suggestion is to create a small script in your favorite language that automatically trains the classifier. If your training data is laying around on your machine locally (perhaps automatically collected?=) you can just batch it into our web API. If you haven’t collected the training data yet you could create a script that automatically collects it and train the classifier with it!
4. Start classifying
This is the fun part, when you have created your classifier you can start to use it. You can always test it in our GUI. Further you can (and should) build your own web site around it via our web API – providing the world with more semantics and cool classifications that never have been seen before! Also – remember that you can use your classifiers commercially and make money on it!
I’ve published the example classifier, don’t expect it to work perfectly – it has only been trained on 20 articles per class! Test it here – Example News Categorizer
Summary
- Find out what you want to classify on and create a classifier
- Define and create the categories
- Collect training data for each category
- Train each category on the gathered data
- Build a really cool web site around it!


